This is one of the most common workflows used when you need to link the consent of a logged in user to a third-party system such as a CRM or a marketing platform.
The Secure Privacy REST API allows you to assign a custom user ID (e.g. email address) to a consent. This is useful for linking a data subject from Secure Privacy to a user in your system.
Assigning a Custom User ID to a Consent Record
Section titled “Assigning a Custom User ID to a Consent Record”To assign a custom user ID to a consent record after a user has logged into your system, you can use the following PATCH endpoint. This is typically done through a callback function that’s triggered after successful user authentication.
Endpoint
Section titled “Endpoint”PATCH /api/consent/customuserid/:clientIdRequest Body
Section titled “Request Body”{ "DomainId": "string", "CustomUserId": "string"}Example Implementation
Section titled “Example Implementation”Here’s an example of how to implement this in your authentication callback:
// The Secure Privacy script will set a localStorage item called// s_e_c_u_r_e_k_e_y which is the unique ID associated with the clientconst clientId = localStorage.getItem("s_e_c_u_r_e_k_e_y");
// This is the domain ID of website and can be found in your Secure Privacy script tagconst domainId = "YOUR_DOMAIN_ID";
// This is the custom user ID you want to assign to the user - here we use an email address
async function handleUserLogin(clientId, domainId, customUserId) { try { const response = await fetch( `https://api.secureprivacy.com/api/consent/customuserid/${clientId}`, { method: "PATCH", headers: { "Content-Type": "application/json", Authorization: "Bearer YOUR_API_KEY", }, body: JSON.stringify({ DomainId: domainId, CustomUserId: customUserId, }), } );
if (!response.ok) { throw new Error("Failed to update consent record"); }
const result = await response.json(); console.log("Successfully linked consent to user:", result); } catch (error) { console.error("Error linking consent:", error); }}Best Practices
Section titled “Best Practices”- Always implement this in your authentication callback flow
- Store the client ID when the user first gives consent
- Ensure you have proper error handling in place
- Validate the custom user ID format before sending
- Keep your API key secure and never expose it in client-side code
Response
Section titled “Response”A successful response will return a 200 OK status code with the updated consent record:
{ "ClientId": "string", "CustomUserId": "string", "PageURL": "string", "Consents": [ { "ComplianceType": "string", "ComplianceTypeID": "string", "ConsentGiven": "boolean", "PluginPreferences": "string", "ComplianceLawType": "string" } ], "IabConsents": [ { "Name": "string", "Id": "integer", "ConsentGiven": "boolean", "ConsentType": "string" } ]}View your Consents in the Secure Privacy Platform
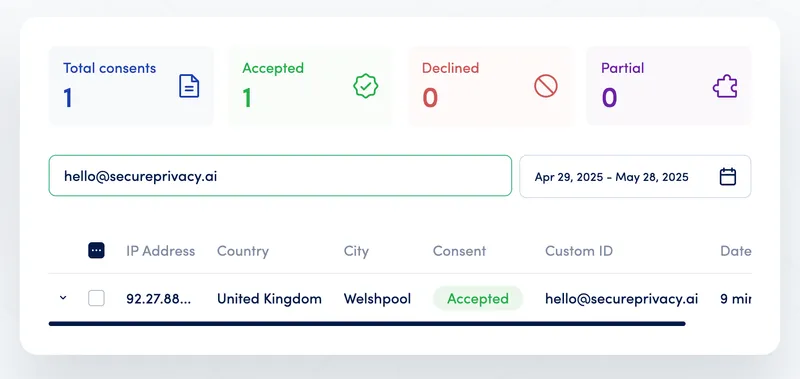
Section titled “View your Consents in the Secure Privacy Platform”Navigate to Domains —> Reports —> Consents in the Secure Privacy Platform and you should see the custom user ID assigned to the consent.
Please note that you can search for the custom user ID in the Search field at the top of the page.