


Cross-device tracking lets you see the consent choices a single user has made on every device they use — for example your website on a laptop and your app on a phone — in one place.
By default, Secure Privacy has no way to know that two devices belong to the same person. Each browser and each app install gets its own anonymous client ID, and each client ID has its own consent record. To connect them, you attach the same custom user ID (for example the user’s account ID or email address) to each of those records when the user logs in.
How it works
Section titled “How it works”| Device | Client ID (generated by Secure Privacy) | Custom user ID (set by you) |
|---|---|---|
| Website on a laptop | 9f2c…a71e |
user_48213 |
| Android app on phone | 41bd…07c3 |
user_48213 |
| iOS app on tablet | c8e0…5b92 |
user_48213 |
The client IDs are all different, so on their own the three records look like three different people. Because they share the custom user ID user_48213, you can query for that ID and get all three records back.
Example: one user on web and mobile
Section titled “Example: one user on web and mobile”Jane visits your online shop on her laptop. The cookie banner appears and she accepts analytics but declines advertising. Later that day she installs your Android app and accepts everything.
Without cross-device tracking you have two unrelated, anonymous consent records. With it:
- Jane logs in on the website. Your site sends the web client ID to your backend, and your backend links it to
user_48213. - Jane logs in on the app. Your app sends the mobile client ID to your backend, and your backend links it to
user_48213. - Your support team, CRM sync or reporting job asks Secure Privacy for every consent belonging to
user_48213and gets both records — showing what Jane chose on each device and when.
The rest of this guide walks through those three steps.
Before you start
Section titled “Before you start”You will need:
- A Secure Privacy API key, from Account –> API Integrations in the Secure Privacy Platform. See API Setup & Authentication.
- Your website’s Domain ID and your app’s Mobile Application ID. See Where to find your IDs.
- A stable custom user ID for each logged-in user. See Choosing a custom user ID.
Where to find your IDs
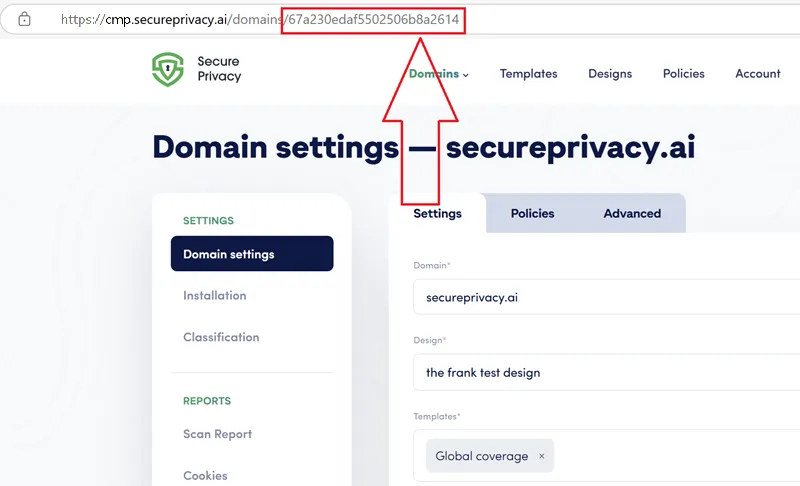
Section titled “Where to find your IDs”Open your domain in the Secure Privacy Platform. The Domain ID is the last part of the page URL:
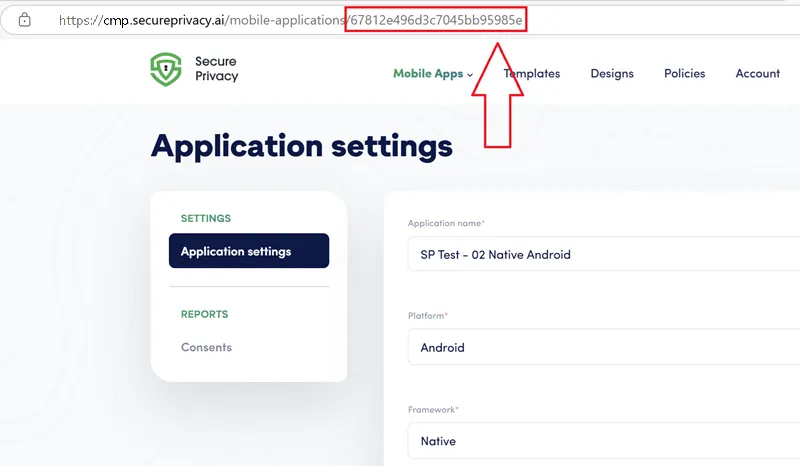
Open your app under Mobile Apps. The Mobile Application ID is the last part of the page URL:
Step-by-step
Section titled “Step-by-step”-
Send the web client ID to your backend after login
The Secure Privacy script stores the browser’s client ID in
localStorageunders_e_c_u_r_e_k_e_y. After a successful login, read it and send it to your own backend:Website (browser) async function onLoginSuccess() {const clientId = localStorage.getItem("s_e_c_u_r_e_k_e_y");if (!clientId) return; // The banner has not run yet on this browser// Your own backend route, not a Secure Privacy endpointawait fetch("/api/consent-link", {method: "POST",headers: { "Content-Type": "application/json" },body: JSON.stringify({ platform: "web", clientId }),});} -
Send the mobile client ID to your backend after login
The mobile SDKs expose the client ID through
getClientId. After a successful login, read it and send it to the same route on your backend:val clientId = spConsentEngine.getClientId("YOUR_APPLICATION_ID")// POST { "platform": "mobile", "clientId": clientId } to /api/consent-linklet clientId = spConsentEngine?.getClientId(applicationId: "YOUR_APPLICATION_ID")// POST { "platform": "mobile", "clientId": clientId } to /api/consent-linkconst result = await SecurePrivacyMobileConsent.getClientId("YOUR_APPLICATION_ID");const clientId = result.data;// POST { platform: "mobile", clientId } to /api/consent-linkfinal result = await spConsentEngine.getClientId("YOUR_APPLICATION_ID");final clientId = result.data;// POST { "platform": "mobile", "clientId": clientId } to /api/consent-linkThe mobile client ID changes after a fresh install, a new SDK session, or a call to
clearSession(), so send it on every login rather than only the first time. -
Link the client ID to the custom user ID from your backend
Your backend knows who is logged in, so it supplies the custom user ID itself — never trust one sent by the client. It then calls the web or mobile linking endpoint depending on where the client ID came from:
Backend (Node.js) const BASE_URL = "https://api-prod.secureprivacy.ai";const API_KEY = process.env.SECURE_PRIVACY_API_KEY;const DOMAIN_ID = process.env.SECURE_PRIVACY_DOMAIN_ID;const MOBILE_APP_ID = process.env.SECURE_PRIVACY_MOBILE_APP_ID;// Your own route, called by the website and the app after login.// It forwards the client ID to the Secure Privacy linking endpoint.app.post("/api/consent-link", requireLogin, async (req, res) => {const { platform, clientId } = req.body;const customUserId = req.user.id; // e.g. "user_48213"const url =platform === "mobile"? `${BASE_URL}/api/mobileconsent/customuserid/${encodeURIComponent(clientId)}`: `${BASE_URL}/api/consent/customuserid/${encodeURIComponent(clientId)}`;const body =platform === "mobile"? { MobileApplicationId: MOBILE_APP_ID, CustomUserId: customUserId }: { DomainId: DOMAIN_ID, CustomUserId: customUserId };const response = await fetch(url, {method: "PATCH",headers: {"Content-Type": "application/json",Accept: "application/json",Authorization: `Bearer ${API_KEY}`,},body: JSON.stringify(body),});if (response.status === 404) {// No consent recorded for this client ID yet — the user has not// answered the banner on this device. Retry on the next login or consent event.return res.sendStatus(202);}res.sendStatus(response.ok ? 204 : 502);});The linking call returns:
Status Meaning 200 OKThe consent record now carries the custom user ID. 403 ForbiddenThe Domain ID or Mobile Application ID does not belong to the account that owns the API key. 404 Not FoundNo consent exists for this client ID yet, usually because the user has not answered the banner on this device. Once a record is linked, the custom user ID stays on it when the user later changes their choices on that device.
-
Look up every consent for a user
Now any backend job can ask for all of Jane’s consents, across devices, by filtering both extraction endpoints on her custom user ID:
Backend (Node.js) async function getConsentsForUser(customUserId) {const headers = {Accept: "application/json",Authorization: `Bearer ${API_KEY}`,};const query = `CustomUserId=${encodeURIComponent(customUserId)}`;const [web, mobile] = await Promise.all([fetch(`${BASE_URL}/api/consents?DomainId=${DOMAIN_ID}&${query}`, { headers }).then((r) => r.json()),fetch(`${BASE_URL}/api/mobileconsents?MobileAppId=${MOBILE_APP_ID}&${query}`, { headers }).then((r) => r.json()),]);// The CustomUserId filter is a case-insensitive "starts with" match,// so "user_4821" would also return "user_48213". Keep exact matches only.const exact = (record) => record.CustomUserId === customUserId;return {web: web.PagedResults.filter(exact),mobile: mobile.PagedResults.filter(exact),};}For Jane, this returns one web record (
Status: "Partial"— analytics accepted, advertising declined) and one mobile record (ConsentGiven: "All"), each with its ownLastUpdatedtimestamp.
Choosing a custom user ID
Section titled “Choosing a custom user ID”The custom user ID is the only thing that joins devices together, so it must be identical on every platform.
- Remember that an email address is personal data (PII). Using one means Secure Privacy stores that email with the consent record. If you would rather not share it, use an internal account or customer ID instead.
- If you use an email address, normalise it — trim whitespace and lowercase it — before every linking call.
[email protected]and[email protected]are two different custom user IDs. - Use the same ID for every platform. Web, mobile and TV must all send exactly the same value.
Best practices
Section titled “Best practices”- Link on every login, not just the first one — client IDs can change after a reinstall, cleared browser storage, or a new SDK session.
- Handle
404 Not Foundfrom the linking call. If a user logs in before answering the banner, there is no record to link yet, so retry after they give consent (for example from a consent event listener) or on their next login. - Keep the API key on your backend and set the custom user ID from your authenticated session, not from client input.
- Filter lookups to exact matches, because the
CustomUserIdquery parameter matches by prefix. - When a user logs out on a shared device, call
clearSession()in the mobile SDK so the next person’s consent is not linked to the previous user. - Decide up front how your systems should treat conflicting choices across devices — for example, honouring the most recent decision or the most restrictive one.
View linked consents in the Secure Privacy Platform
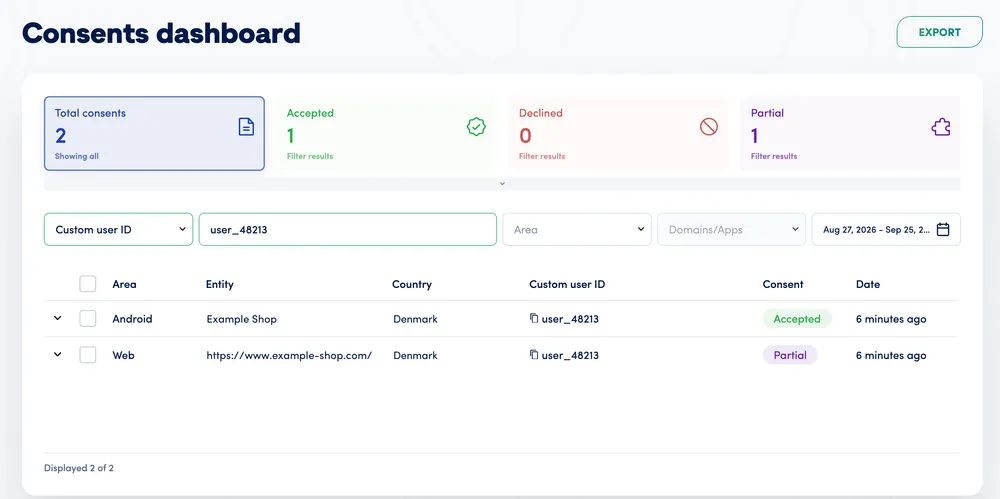
Section titled “View linked consents in the Secure Privacy Platform”The Consents dashboard shows web, mobile and TV consents together, which makes it the quickest way to see one user across all their devices.
- Select Consents in the main navigation to open the Consents dashboard.
- In Filter field, choose Custom user ID.
- Enter the custom user ID, for example
user_48213.
Every linked record for that user is listed, one row per device. The Area column shows where each consent was given (for example Web, Android or tvOS), and the Consent column shows the decision made there. For Jane, you would see a Web row marked Partial and an Android row marked Accepted.
You can also search a single website or app: open the domain or mobile app, go to Reports –> Consents, and search by Custom user ID.
Related guides
Section titled “Related guides”- Linking Consents to a Custom User ID — the single-device version of this workflow.
- Web Consent API and Mobile Consent API — endpoint reference.
- Salesforce CRM integration — using the custom user ID to match consents to CRM contacts.